Gatecheck
Gatecheck
![]()
![]()
![]()
Gatecheck automates report validation in a CI/CD Pipeline by comparing security findings to pre-determined thresholds. It also provides report aggregation, artifact integrity, and deployment validation. Gatecheck is stateless so self-hosting and provisioning servers is not required.
Getting Started
The fastest way to get started with Gatecheck is to download the pre-built binaries for your target system.
cd <target install dir>
curl -L <OS Specific Release>.tar.gz | tar xz
./gatecheck
./gatecheck --help
The Gatecheck CLI supports --help for every command for more detail usage.
Generate a configuration file with the default thresholds set
gatecheck config init > gatecheck.yaml
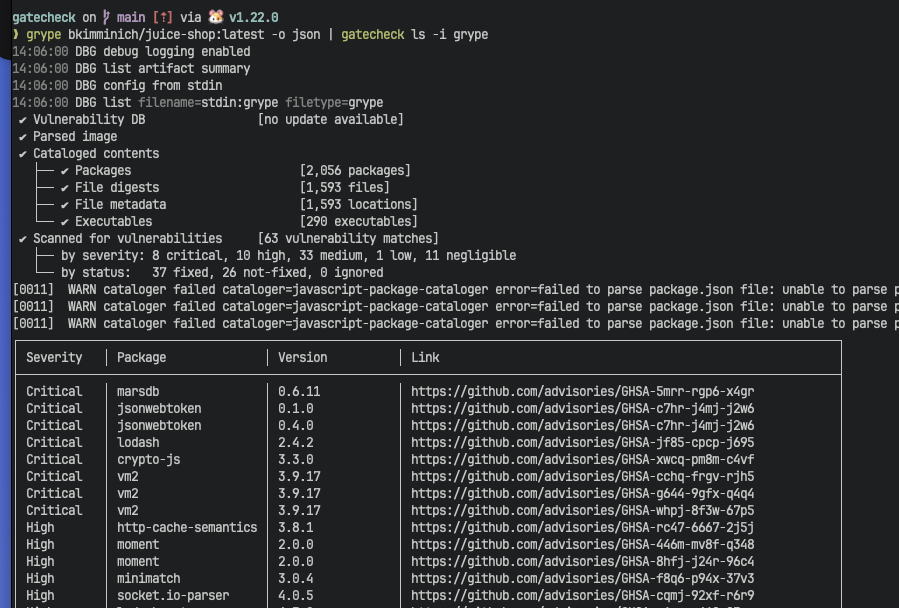
Summarize Reports with List
gatechec ls --help
List with EPSS Scores is support for Grype and Cyclondex reports
Validation
List with EPSS Scores is support for Grype and Cyclondex reports

Bundling Artifacts
Bundling Artifacts produces a gzipped tarball with an associated manifest for metadata.
Installation
Prerequisites
Before installing Gatecheck, make sure your system meets the following requirements:
- Operating System: Windows, macOS, or Linux.
- Go: Version 1.22.0 or newer (only required if you plan to build the application from source).
Installation Options
Gatecheck can be installed either by downloading the pre-compiled binary for your operating system or by compiling the source code.
Option 1: Installing from Binary
-
Download the Binary: Visit the Gatecheck GitHub releases page at
https://github.com/gatecheckdev/gatecheck/releasesand download the latest version for your operating system. -
Unpack the Binary (if necessary): For Windows and Linux, you may need to unpack the
.zipor.tar.gzfile. -
Move the Binary to a Bin Directory:
- Windows: Move
gatecheck.exeto a directory within your PATH, such asC:\Windows. - macOS/Linux: Move
gatecheckto a location in your PATH, such as/usr/local/bin. You can use the commandmv gatecheck /usr/local/binin the terminal.
- Windows: Move
-
Verify Installation: Open a terminal or command prompt and type
gatecheck --versionto ensure the application is installed correctly.
Option 2: Building from Source
-
Clone the Repository: Clone the Gatecheck repository to your local machine using Git:
git clone https://github.com/gatecheckdev/gatecheck -
Navigate to the Repository Directory:
cd gatecheck -
Install Task: Ensure you have Task installed.
-
Build and Install: Run:
task installThis will build the binary and install it to
/usr/local/bin(configurable via INSTALL_DIR). -
Verify Installation: Check the application version to confirm successful installation:
gatecheck --version
Post-Installation Steps
After installing Gatecheck, you can begin using it by typing gatecheck followed by the necessary commands and
options in your terminal or command prompt. For a list of available commands and their descriptions, use:
gatecheck --help
Troubleshooting
If you encounter any issues during the installation process, ensure that you have the correct permissions to install software on your system and that your Go environment is properly configured. For further assistance, please visit the Gatecheck GitHub issues page or contact support.
For more information on using Gatecheck, refer to the user documentation or the GitHub repository for examples and advanced usage.
Usage
Gatecheck is a lightweight CLI utility for handling security reports. It allows bundling reports, listing their contents, validating against configurations, and more.
Developers can use it to summarize reports, run local audits, cross-reference with EPSS and KEV, and bundle reports for attestation.
Run gatecheck --help for available commands.
Key commands:
gatecheck bundle: Bundle reports into a .gcb file.gatecheck config: Generate or manage config files.gatecheck list: List contents of reports or bundles.gatecheck validate: Validate reports against config.gatecheck download: Download EPSS or KEV data.
See CLI Reference for details.
CLI Reference
This section provides a detailed reference for all Gatecheck CLI commands, including subcommands, options, examples, and use cases.
gatecheck
The root command. Displays help information.
Usage:
gatecheck [command]
Use Case: Entry point to access all functionalities. Run without arguments to see available commands.
gatecheck bundle
Manage Gatecheck bundles (.gcb files) which aggregate multiple security reports.
gatecheck bundle new
Create a new empty bundle file.
Usage:
gatecheck bundle new <bundle-file>
Example:
gatecheck bundle new myproject.gcb
Use Case: Initialize a new bundle before adding reports, useful for starting a new attestation or archive.
gatecheck bundle add
Add a report to an existing bundle.
Usage:
gatecheck bundle add <bundle-file> <report-file> --type <report-type>
Options:
--type: Specify report type (e.g., grype, cyclonedx, semgrep, gitleaks)
Example:
gatecheck bundle add myproject.gcb grype-report.json --type grype
Use Case: Aggregate reports from different tools into one file for easy sharing, auditing, or CI/CD integration.
gatecheck bundle list
List the contents of a bundle.
Usage:
gatecheck bundle list <bundle-file>
Example:
gatecheck bundle list myproject.gcb
Use Case: Quickly inspect what reports are in a bundle without extracting them, helpful for verification.
gatecheck config
Manage configuration files for validation.
gatecheck config new
Generate a new default configuration file.
Usage:
gatecheck config new <config-file> [--format yaml|json|toml]
Example:
gatecheck config new gatecheck.yaml
Use Case: Create a starting point for defining validation rules, then customize thresholds for your project.
gatecheck download
Download external datasets like EPSS or KEV.
Usage:
gatecheck download <type> <output-file>
Types: epss, kev
Example:
gatecheck download epss epss_scores.csv
Use Case: Fetch latest vulnerability scoring data for offline use in validation or analysis.
gatecheck list
List contents of a report or bundle in a human-readable format.
Usage:
gatecheck list <file> [--input-type <type>]
Example:
gatecheck list grype-report.json
Use Case: Summarize lengthy JSON reports for quick review, e.g., checking vulnerability counts without parsing JSON manually.
gatecheck validate
Validate reports against a configuration file.
Usage:
gatecheck validate <config-file> <target-file>
Example:
gatecheck validate gatecheck.yaml bundle.gcb
Use Case: Ensure security reports meet project thresholds before deployment, integrating into CI pipelines for automated checks.
gatecheck version
Print the version information.
Usage:
gatecheck version
Example:
gatecheck version
Use Case: Verify the installed version for compatibility or reporting issues.
List Reports
Gatecheck can list contents of supported reports in a human-readable format.
Example with Grype:
grype image:tag -o json | gatecheck list --input-type grype
Or from file:
gatecheck list grype-report.json
Supports Grype, Cyclonedx, Semgrep, Gitleaks, etc.
Gatecheck Bundle
Gatecheck bundles multiple security reports into a single .gcb file for easy sharing and attestation.
Commands
gatecheck bundle new bundle.gcb: Create a new bundle.gatecheck bundle add bundle.gcb report.json --type grype: Add a report.gatecheck bundle list bundle.gcb: List contents.
Bundles can include metadata and multiple report types.
Validation
Gatecheck validates reports against a config file.
Command
gatecheck validate config.yaml report.json
Or with bundle:
gatecheck validate config.yaml bundle.gcb
Rules Precedence
- CVE Limit
- CVE Risk Acceptance
- KEV Limit
- EPSS Risk Acceptance
- EPSS Limit
- Severity Limit
See Configuration for details.
Examples
Basic Usage
Bundle reports:
gatecheck bundle new mybundle.gcb
gatecheck bundle add mybundle.gcb grype.json --type grype
Validate:
gatecheck validate config.yaml mybundle.gcb
Supported Reports
Gatecheck supports the following report types:
- Grype: Vulnerability scans.
- Cyclonedx: SBOM with vulnerabilities.
- Semgrep: SAST findings.
- Gitleaks: Secret detection.
- Coverage: LCOV code coverage (planned or check code).
Each can be listed, bundled, and validated.
Configuration
Gatecheck uses configuration files to define validation rules for security reports. These files can be in YAML, JSON, or TOML format. The configuration specifies thresholds, limits, and risk acceptances for various report types, allowing you to customize validation to your project’s security requirements.
Creating a Configuration File
To generate a default configuration file, use the CLI:
gatecheck config new config.yaml
This creates a file with all fields set to default values (mostly disabled with zero limits). You can then edit it to enable rules and set appropriate values.
Configs support three formats:
- YAML (.yaml or .yml)
- JSON (.json)
- TOML (.toml)
The structure is the same across formats. Below is a detailed explanation of each section and field, based on the Gatecheck codebase.
Top-Level Fields
-
version (string): The configuration version. Currently “1”. Reserved for future schema changes.
-
metadata (object): Arbitrary metadata that doesn’t affect validation.
- tags (array of strings): Custom tags for organization or notes, e.g., [“auto-generated”, “prod-config”].
Grype Configuration
This section defines rules for Grype vulnerability reports.
-
severityLimit (object): Sets limits on the number of vulnerabilities per severity level. Exceeding a limit fails validation.
- critical/high/medium/low (objects):
- enabled (boolean): Whether this limit is active.
- limit (unsigned integer): Maximum allowed vulnerabilities of this severity.
- critical/high/medium/low (objects):
-
epssLimit (object): Fails validation if any vulnerability’s EPSS score exceeds this limit.
- enabled (boolean): Activate this rule.
- score (float): Maximum allowed EPSS score (0.0 to 1.0).
-
kevLimitEnabled (boolean): If true, fails validation if any vulnerability matches the Known Exploited Vulnerabilities (KEV) catalog.
-
cveLimit (object): Fails validation if any specified CVE is present.
- enabled (boolean): Activate this rule.
- cves (array of objects):
- id (string): The CVE ID (e.g., “CVE-2024-1234”).
- metadata (object):
- tags (array of strings): Optional tags for the CVE.
-
epssRiskAcceptance (object): Skips validation for vulnerabilities with EPSS scores below this threshold (risk accepted).
- enabled (boolean): Activate this rule.
- score (float): Minimum EPSS score for validation; lower scores are accepted.
-
cveRiskAcceptance (object): Skips validation for specified CVEs (risk accepted).
- enabled (boolean): Activate this rule.
- cves (array of objects): Same structure as in cveLimit.
Example (YAML):
grype:
  severityLimit:
    critical:
      enabled: true
      limit: 0
    high:
      enabled: true
      limit: 5
  epssLimit:
    enabled: true
    score: 0.5
  kevLimitEnabled: true
  cveLimit:
    enabled: true
    cves:
      - id: CVE-2023-1234
        metadata:
          tags: ["critical"]
  epssRiskAcceptance:
    enabled: true
    score: 0.1
  cveRiskAcceptance:
    enabled: true
    cves:
      - id: CVE-2023-5678
Use Case: Enforce zero critical vulnerabilities but allow up to 5 high ones, while accepting low-EPSS risks.
Cyclonedx Configuration
Identical structure to Grype. Applies to CycloneDX SBOM reports with vulnerabilities.
Example: Same as Grype section above, under cyclonedx.
Semgrep Configuration
For Semgrep SAST reports.
-
severityLimit (object): Limits on findings per severity.
- error/warning/info (objects):
- enabled (boolean)
- limit (unsigned integer)
- error/warning/info (objects):
-
impactRiskAcceptance (object): Accepts findings based on impact level.
- enabled (boolean): Activate this rule.
- high/medium/low (booleans): If true, accept findings of that impact level.
Example (YAML):
semgrep:
  severityLimit:
    error:
      enabled: true
      limit: 0
    warning:
      enabled: true
      limit: 10
  impactRiskAcceptance:
    enabled: true
    high: false
    medium: true
    low: true
Use Case: Fail on any errors, allow up to 10 warnings, and accept all medium/low impact findings.
Gitleaks Configuration
For Gitleaks secret detection reports.
- limitEnabled (boolean): If true, fails validation if any non-ignored secrets are found.
Example (YAML):
gitleaks:
  limitEnabled: true
Use Case: Ensure no secrets are leaked in the codebase.
Coverage Configuration
For LCOV code coverage reports.
- lineThreshold (float): Minimum required line coverage percentage (0-100).
- functionThreshold (float): Minimum required function coverage percentage.
- branchThreshold (float): Minimum required branch coverage percentage.
Example (YAML):
coverage:
  lineThreshold: 80.0
  functionThreshold: 75.0
  branchThreshold: 70.0
Use Case: Enforce minimum test coverage levels in CI/CD pipelines.
Full Example Configuration (YAML)
version: "1"
metadata:
  tags: ["project-x", "v1.0"]

grype:
  # ... (as above)

cyclonedx:
  # ... (similar to grype)

semgrep:
  # ... (as above)

gitleaks:
  limitEnabled: true

coverage:
  lineThreshold: 80.0
  # ... (as above)
Tips for Writing Configurations
- Start with the default generated file and enable rules incrementally.
- Use risk acceptance to grandfather in known issues while enforcing stricter rules for new vulnerabilities.
- Integrate with CI/CD: Validate in pipelines to block merges/deployments if rules fail.
- Formats are interchangeable; choose based on your ecosystem (e.g., YAML for Kubernetes-heavy projects).
- Validation follows a specific order of precedence (see Validation docs).
For more details, refer to the source code in pkg/gatecheck/config.go.
Library Usage
Gatecheck can be used as a Go library.
Import packages from pkg/:
import "github.com/gatecheckdev/gatecheck/pkg/gatecheck"
Use functions for config, validation, etc.